skip to main |
skip to sidebar
I wanna thank Teresa for picking me to have this award.it means a lot to me:)
Ok.....The goal of the award is to bring recognition to blogs with minimal followers. Since I have accepted this award, I must pass it on to at least 3 other blogs (but not more than 5) that have inspired me and that I feel deserve much more attention!
The rules are to say "Thank you!" on our blog to the one who awarded us and to link back to their blog. Then, pick the blogs to pass on the award, leave a note on their blog and then list them with links to their blogs, etc....
That being said, I've chosen 3 great blogs:
Scraps with Attitude
Tammy's Scraps
Divine Intentionz

that have a working knowledge of PSP.
Supplies Needed:
PSP 9 (any version will work)
Tube of Choice: I used artwork of Elias Chatzoudis.
You can purchase it from Psp Tube Emporium
Pluggins needed:
Penta: jeans
Tag template created by me: You can download it HERE
Font of choice: HaloHandletter. You can download it for free at dafont.com
Ok Let’s begin.
Open my template. Hit shift +D on your keyboard and close the original template.
Click on the black rectangle layer. Selections-select all – Selections –float Selections – Defloat
Open the tubes of choice, copy and paste them as new layers. You can place them to your likings. I placed them four different ways.
Once you have them placed to your likings, selections-invert and hit the delete key on your keyboard. You will do this for each tube layer you placed in the black rectangle.
Selections – select none.
Now find the top tube layer in your layers palette and right click Merge down. Do this until you have all your tube layers merged into one layer.
Duplicate your tube layer. And change the blend mode to Softlight
On the duplicated layers apply the jeans plug in with these settings.
Amount: 62 Border width: 4
Apply the same jeans plug in again. Same settings as above on the same layer.
Copy and paste your main tube as new layer and position it to your likings. I used 2 tubes.
Now click on the pink Easter layer.
Adjust- add/remove noise – add noise
Use these settings:
Gaussian checked, monochrome checked Noise 54
Click ok.
Add drop shadow of choice to all layers.
Add your copyright information and your name
Save as a PNG.. ( if you want it to have a transparent background)
Thank you for trying my tutorial.

This tutorial was written for those
that have a working knowledge of PSP.
Supplies Needed:
PSP 10 (any version will work)
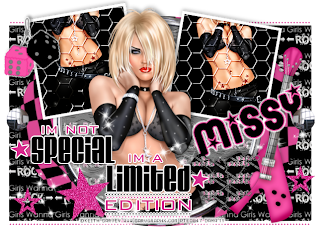
Tube of Choice I used artwork of Keith Garvey.
You can purchase it from Psp Tube Emporium
Scrap kit of choice. I used Girls Wanna Rock by Missy
You can purchase her kit at Scraps with Attitude
Pluggins needed:
Eye Candy 3: Glow (optional)
Tag Template 381 by : Missy you can download it @Tag Templates by Missy
Font of choice: Pornstar
Ok Let’s begin…
1. Open your template in psp. Hit shift + D and close the original.
2. Click on the rectangle layer in your layers palette. Selection, select all, Selections Float, Selects Defloat
3. Open the paper of choice from your kit, copy and paste as new layer. Selection- invert and hit delete on your keyboard. Selections- select none.
4. Click on the oval layer in your layers palette. Selection, select all, Selections Float, Selects Defloat
5. Open another paper of choice, copy and paste as new layer. Selections- invert and hit delete on your keyboard. Selections – select none.
6. Click on the circle layer in your layers palette. Selection, select all, Selections Float, Selects Defloat
7. Open paper of choice, copy and paste as new layer. Selections –invert and hit delete on your keyboard. Selections – select none.
8. Click on the frame back layer in your layers palette. Flood fill with black. Do this for both of the frame back layers.
9. Back on the first frame back layer. Selection, select all, Selections Float, Selects Defloat
10. Open your tube of choice. Copy and paste as new layer and position it to your likings. Selections – invert and kit delete on your keyboard.
11. I added the fencing layer to mine. This is optional. If you are doing it my way then
Open that fencing copy and paste as new layer. And kit delete on your keyboard. Selections- select none.
12. On your original tube layer, duplicate and move it on top of the fencing layer. And change the mood to hard light.
13. Follow steps 8 thru 12 for the other frame back layer.
14. Copy and paste your main tube as new layer and position to your likings.
15. Add drop shadow of choice.
16. Add any extra elements you would like to add.
17. Add the same drop shadow to each elelment.
18. Add your copy right information and your name.
19. Save as a png ( to have the transparent background)
Thank you for trying my tutorial. I love to hear feedback .

This tutorial was written for those
that have a working knowledge of PSP.
Supplies Needed:
PSP 9 (any version will work)
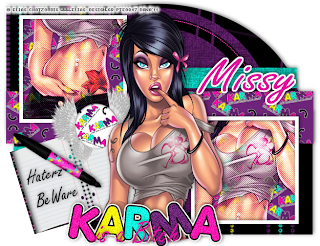
Tube of Choice I used artwork of Elias Chatzoudis. You must have a license to use his work.
You can purchase it from Psp Tube Emporium
Scrap kit of choice. I used Karma by Missy
You can purchase her kit at Scraps with Attitude
Pluggins needed:
Penta: jeans
Eye Candy 3: Glow (optional)
Tag Template 376 by : Missy you can download it @Tag Templates by Missy
Font of choice: Freestyle Script
Ok Let’s begin.
Open your template in psp. Hit the shift +D at the same time and close the original template.
Close of the copyright layer in your layer pallet.
Open the paper of choice from your kit. Click on the oval layer and do the following:
Selections, select all, selections float, selections defloat
Copy and paste your paper of choice and make sure it covers the selected area.
Then Selection, invert and then hit the delete key on your key board.
Selections select none.
Now in your layers pallet close off the original oval layer.
Add drop shadow of choice.
In your layers pallet find the circle 1 layer.
Open the paper of choice from your kit. Click on the circle1 layer and do the following:
Selections, select all, selections float, selections defloat
Copy and paste your paper of choice and make sure it covers the selected area.
Then Selection, invert and then hit the delete key on your key board.
Selections select none.
Close off the circle 2 layer and add the same drop shadow as before.
In your layers pallet find the circle 2 layer.
Open the paper of choice from your kit. Click on the circle 2 layer and do the following:
Selections, select all, selections float, selections defloat
Copy and paste your paper of choice and make sure it covers the selected area.
Then Selection, invert and then hit the delete key on your key board.
Selections select none.
Close off the circle 2 layer and add the same drop shadow as before.
In your layers pallet find the shape 1 layer.
Open the paper of choice from your kit. Click on the shape1 layer and do the following:
Selections, select all, selections float, selections defloat
Copy and paste your paper of choice and make sure it covers the selected area.
Then Selection, invert and then hit the delete key on your key board.
Selections select none.
Close off the shape 1 layer and add the same drop shadow as before.
In your layers pallet find the rectangle layer.
Open the paper of choice from your kit. Click on the rectangle layer and do the following:
Selections, select all, selections float, selections defloat
Copy and paste your paper of choice and make sure it covers the selected area.
Then Selection, invert and then hit the delete key on your key board.
Selections select none.
Close off the rectangle layer and add the same drop shadow as before.
In your layers pallet find the copy of rectangle 1 layer.
Open the paper of choice from your kit. Click on the copy of rectangle1 layer and do the following:
Selections, select all, selections float, selections defloat
Copy and paste your paper of choice and make sure it covers the selected area.
Then Selection, invert and then hit the delete key on your key board.
Selections select none.
Close off the copy of rectangle1 layer and add the same drop shadow as before.
In your layers pallet find the raster10 layer.
Open the paper of choice from your kit. Click on the raster 10 layer and do the following:
Selections, select all, selections float, selections defloat
Copy and paste your paper of choice and make sure it covers the selected area.
Then Selection, invert and then hit the delete key on your key board.
Selections select none.
Close off the raster 10 layer and add the same drop shadow as before.
Now you will open your tube of choice.
Copy and paste as new layer. Position it in the center of your canvas. Now you will cut off the bottom on your tube so it looks like your tube is in the circle. Add drop shadow of choice.
In your layers pallet find the frame back 1 layer.
Open the paper of choice from your kit. Click on the frame back 1 layer and do the following:
Selections, select all, selections float, selections defloat
Copy and paste your paper of choice and make sure it covers the selected area.
Then Selection, invert and then hit the delete key on your key board.
Keep selected , copy and paste your tube as a new layer and position it to you likings.
And hit the delete key on your keyboard.
Selections, select none.
In your layers pallet duplicate this layer and change the blend mode to hard light.
On the duplicated layer apply the penta: jeans plugin with these settings:
Amount 62, border width 4
Now go back to your original tube layer you added to the frame and lower the opacity to 56
In your layers pallet find the frame back 2 layer.
Open the paper of choice from your kit. Click on the frame back 2 layer and do the following:
Selections, select all, selections float, selections defloat
Copy and paste your paper of choice and make sure it covers the selected area.
Then Selection, invert and then hit the delete key on your key board.
Keep selected , copy and paste your tube as a new layer and position it to you likings.
I placed a different part of my tube in this frame. Your choice.
And hit the delete key on your keyboard.
Selections, select none.
In your layers pallet duplicate this layer and change the blend mode to hard light.
On the duplicated layer apply the penta: jeans plugin with these settings:
Amount 62, border width 4
Now go back to your original tube layer you added to the frame and lower the opacity to 56
Add the elements of choice to your canvas and place them to your likings.
Add your name and artist copyright and save as a png.
Thank you for trying my tutorials and I would love your feedback.
Copyright 2009 All Rights Reserved | Template by Custom Blog Designs/FreeStyleMama Creations


